Thursday, June 7, 2012

DIY Reupholstered Chair

I have always wanted to reupholster something, but what! I acquired this chair from my days working at the bank. They had a major remodel and where pitching all their office furniture. So I snagged this one and it became our computer chair for several years. I decided the time had come to give it a makeover, it was desperately in need of one too. The left arm chair not only had rips, but the joint had separated as well and needed some glue. Not to mention that it didn't really blend with our current decor. 


So I started the process of disassembling the chair.  You've no idea how many staples there really are until you start, and think OMG do they really need that many staples in one spot!!!  I'll admit I briefly scanned a few tutorials online but not finding much that would help me with this chair.  I really just wanted to dig in.  So I decided that it would be a smart idea for me to take pictures as I tore down the chair, hoping I would know how to put it back together.  All the padding and springs were in great shape so I used as much of the original bits and pieces as I could.


Since this was my first large upholstery project, I didn't really take many pictures of the process. There were a few problems I ran into though. I tried to remove my fabric pieces in whole sections so I could use them as my pattern for the new fabric. However, I thought to be safe I would allow an extra 2-3 inches of fabric all around. This was not enough in some places so I would recommend more! say 5-6 inches. I ended up having to improvise!! AKA  I had to test my sewing skills, but this was mostly due to the fact that I had not planned on using the decorative tacks.


Next I removed any padding that would be in the way of painting the frame.   I used a dark red as my base and black top coat, sanded, then applied two layers minwax special dark.


After lots of stretching and stapling and a good bit of blind stitching this is what I ended up with.  Not to shabby for a first go around.  Took me about a week to do because I was only able to work on it in between nap times.  Did I mention this is going down to my hubbies automotive office.  I think it's very masculine, or at least I tried to make it that way.  


AFTER I finished this chair I noticed a new post on one of the blogs that I follow.  It was an upholstery tutorial!  Luckily, I've already picked up another chair that needs a makeover.  There was a ton of very helpful information, I just wish I had found it before I started this chair.  Check it out Here.


Thursday, May 17, 2012

Digital Scrapbooking

I decided to take a small break from painting, mainly because it had been raining.  But, I was working on a project for Mother's day and thought it would make a great post.  Since my mother pops in and looks at my blog, I decided to post this after Mother's day.  That way I wouldn't ruin the surprise. 

Any who,  I used to love scrap booking.  But after becoming a mother my time became limited and so did space.  I would start a page and be able to leave it and come back to continue.  Not so much anymore, little fingers are always itching to get into stuff.  I had occasionally seen sites for digi scrappers.  I thought I would give this a try, but I didn't want to spend the money on a program and not like it or decide that I preferred the old way.  So I started looking for free trial programs.  I downloaded a few and ended up only keeping 2 on my computer which I use regularly and for more than just scraping.  My first and favorite is call Studio Scrap .  This program is extremely user friendly! At the time I had downloaded version 2 it was the full program, however you could upgrade to version 3.   I tried it and love it!!!  You can still download a trial from their website, however it is the current version 4 and puts a watermark across your project.  My version (Studio Scrap 2) does not have the watermark.  I think they realized they made an error, but to every one's advantage!  You can still obtain this version by simply searching and downloading from you favorite sharing site, there are several. 

My next favorite program is Gimp.  If you have ever used Adobe Photoshop, this is it's twin in almost every way.  You can do sooo much with this program.  My only qualm about this program is that there are some glitches with compatibility to Windows 7 operating system.  Mostly it just closes out on you, but this has only happened to me a few times and I'm not a computer guru, so I'm not sure which settings to change to fix it!  So I would suggest regular updates as they are constantly improving this program for users.  The other draw back, if you've not used an image manipulation program before, this may not be the best program for you due to lack of a tutorial within the program.  There are however several you-tube video tutorials to help explain and teach you to get the desired results your looking for.  I might add that I had only used Photoshop a handful of times many many years ago!  So I'm big on the video tutorials.  Much like photoshop, Gimp comes preloaded with your standard brushes and textures.  You can also upload your own.  Gimp will accept any add-on software that you can put into photoshop as well!!  I love using different brushes to create my own photo masks,  which I download for free at www.deviantart.com/.  Just search for Photoshop or Gimp brushes and you'll be surprised at the variety of tools you can download for this program.

Now for the fun part.  To start out I had search for free download items like papers, elements and what not to play around with.  I've not purchased loads of kits, most of my collection was free downloads provided to entice individuals to purchase their products.  On that note, I have found a favorite site for purchasing Digi Scrap items, After Five Designs.  They are the only site I've purchased from so far.  Merely due to the design quality.  I've not found another site that offers, what they have.  In my opinion, these ladies are extremely talented with original ideas, and they are constantly designing new kits. 

If you are interested in digital scrapping I suggested peaking at their website or finding them on Facebook.  They almost always have a promotion going on and frequently have guest designers as well.   You may think you don't have the time or patience to try it, but never fear they've taken the guess work out for you!  Almost all their kits come in quick pages as well,  I like these for when I'm in a rush to get something done or my creative juices just aren't flowing!

Ah!  So, you probably what to see some pictures.  Here are the two photos I made for my mother and mother-in-law for Mother's Day.


And for this one I Sea You by NLD

For both of these I used Gimp to make my own word art and to apply the photo mask to the first photo.  The rest was designed with the Studio Scrap 2 program.


And here is a little peak at our Christmas cards that I made for 2011 from the kit


My kid is so cheesy!  I used one of the Christmas card layouts and just inserted his photo.  Then I added the hat and both word art elements.  And viola!  Cute Christmas card! 

Have fun Scrapping!


Thursday, May 10, 2012

Repurposed Craft Table

After the hubby and I found out we had a little bundle of joy on the way, I had to give up my craft room to a nursery.  Most of my stuff went to storage totes and miscellaneous places around the house.  I decided it had been long enough and I wanted a space to do my crafts again.  The only available space for a craft table was in the toy room!  I thought I can make this work, ha ha ha.  (The toy room is only an 8x10 space)  In my mind I had a picture of a long tall table with storage on shelving and in the closet.  This would keep little fingers away for a little while.

I already had two table tops that were purchased for $9 bucks each several years ago....several!  One was too small and the other was too big.  But the larger table would pull apart to allow an additional leaf.  So my thought was to disassemble the table and rotate the two pieces to make a narrow long table that would actually fit my space restrictions.  Sounds easy right.  Not so much.  After discussing with my father, he informed me that additional support would have to be added due to the extended length.

Next I had to find legs, but the only thing I had laying around was an old four post water bed that we no longer needed and had some water damage due to a leak.  Hmmm, the posts ended up being the perfect size to fit in the already made leg pockets of the table.  All I had to do was cut them.

Most of the assembly work and modifications were done in my fathers workshop because I don't have a space large enough to work on this size of a table.  But, from the pictures you can see where we added the additional supports.

We used as much of the original skirt as we could, but had to add two additional pieces to the front and back.  Every thing was unscrewed from the table and then refit as best as we could.  Then once we laid out our pieces, we marked on the table top where each corner fit.  This way we could assemble the skirt, add glue and then place it back into position. Those two rather large black braces are actually the old tracks that would allow the table to pull apart for the leaf.  We bolted them back on, but to keep them from moving had to run a bolt through both pieces of the track to keep it from sliding.  My father still wasn't happy with the support and wanted to make sure that the table could be stood on, LOL.  Just in case my monkey boy actually gets onto this table.  So he added a 2x4 down the center to the table length wise.


Here we cut two angle supports, similar to the originals, for the additional skirt pieces we had to insert.


Angled pocket holes were also drilled from old skirting to new skirting.


And last but not least, even though the posts were large enough to fit into the corner pockets they sat flush with the table skirt.  I wanted the legs to sit out about a quarter inch.  So to push them out a bit we added a trimmed piece of wood to fit inside the pocket.  This way the leg will still sit flush against the inside support and wont have a gap when the bolts are inserted.


Time for table legs!  Instead of using the bed post from the bottom up (if that makes sense), I cut my legs from the middle of the post.  Not only did this leave me with enough to get two smaller sets of legs for other projects, but I wont have a rather large section of square post on the top portion of the table leg before it tapers off.  Looked a little goofy to me! 

You can see the full length of the bed post and where I used the middle section.


You can't really tell from the picture, but the left is the tapered end (bottom) of the table leg.


Next the corner had to be cut so it would sit flush in the leg pocket.  Then two pilot holes were drilled for lag screws.  Lag bolts can also be used to prevent stripping out the wood if you need to disassemble your table to move it.  I decided to use screws because this table is so heavy without the legs that I never want to move it again!


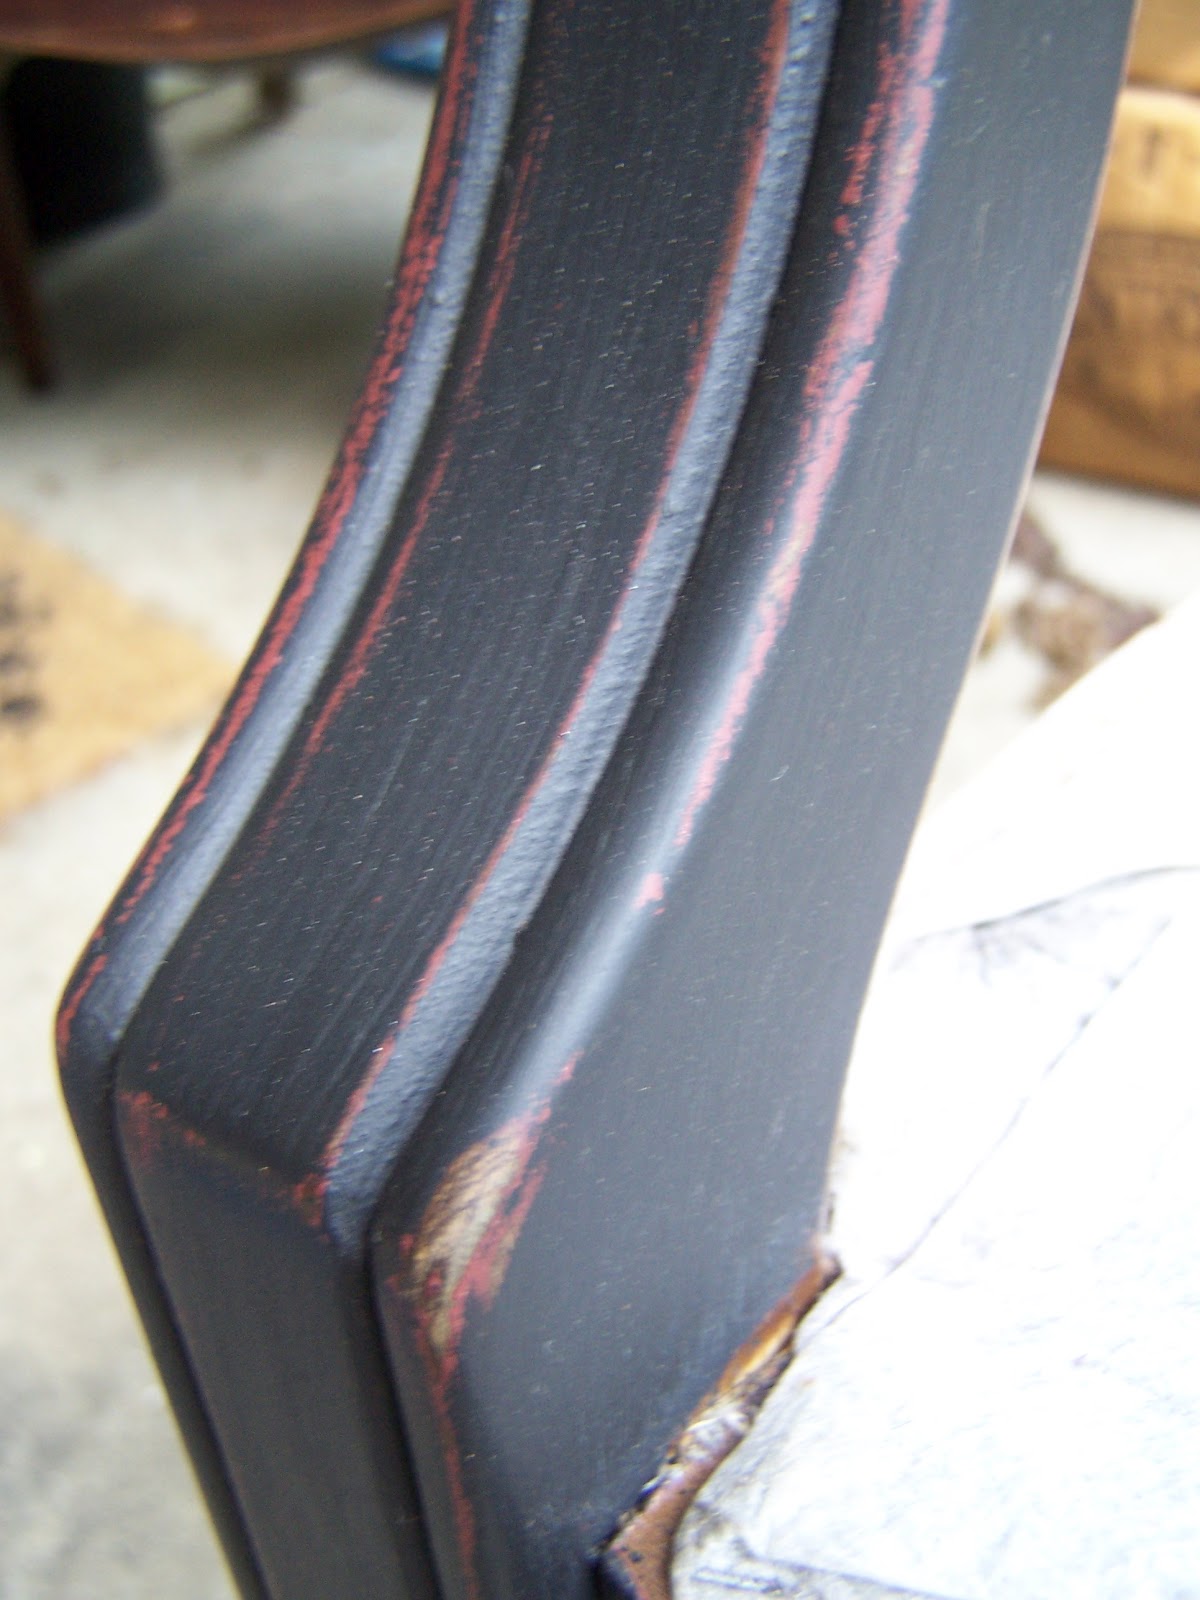
Finally, I get to paint!  While modifying the table we realized that in fact the top was not made of wood!  Ack!  It's some kind of really heavy composite something or other, ha!  With that I decided to try chalk paint so I would not have to sand down the top.  First I gave most of the underside and legs a coat of black spray paint.  Then I ran paraffin wax around all the edges and anywhere else I wanted to see the black come through.  I opted for this for two reasons; first, I was unsure how the "wood" table would react with stain and secondly, after painting another piece with the plaster of paris chalk paint I did not want to be sanding all day! 


Next came my top coat of chalk paint, which I sanded and distressed.  But the colors were a little too bright for me so I brushed on minwax stain in dark walnut and let it sit a few minutes before wiping it off.  Once the stain had dried I applied two coats of minwax finishing paste. 

Here is a little close up of how the chalk paint comes off with the wax underneath.  It's almost a little chippy, but be careful not to rub on too much wax in one spot.  A little goes a long way!

And here she is all said and done!  I believe the table sits 39 in. from the floor to table top and is 33"x77".  That just barely fits my 8x10 room. 


Now I just need to get some stools!


Wednesday, May 9, 2012

DIY Chalk Paint Follow Up

Boy have I been a busy little bee over the weekend.  Last week I decided to pick up unsanded tile grout and Plaster of Paris for my DIY chalk paint.  If you remember a few posts back I'd only tried the baking soda recipe, but still really wanted to find one that would crackle.  I knew my crafting table would be coming home from my dads workshop and would be ready to paint, so I wanted to try these others out before deciding which recipe for chalk paint I like best.

On this first piece I had already sanded it a while ago, but it was waiting for me to decide what I wanted to do with it.  I thought it would make a great candidate!  I used unsanded tile grout mixed with my latex paint (recipe: 1 cup paint to 1 tbsp grout).  My first impression was that it covered well and seemed to go on and dry relatively smooth.  I painted two coats and allowed to sit overnight, then I sanded it the next afternoon.  I started out using 100 grit, but quickly changed to a finer grit (220).  This stuff comes off way to easily for my taste.  I have to wonder how well it's going to adhere to the surface over time (and I sanded this one too!) However of the three, this chalk paint recipe had the smoothest finish with little to no brush strokes.  So If your wanting a super smooth finish, this one's for you.  I would strongly recommend sanding well before painting though.  And follow up with a wipe on poly finish or two good coats of wax.  I did test a few patches of paint on scrap wood I had, I was unable to get this recipe to crackle, bummer.


For the last chalk paint recipe, I decided some ugly gold wall sconces would be my next volunteers.  I didn't want to see the gold too much underneath so I gave them a quick spray in black.  All I had on hand was a high gloss black and thought this would be perfect to see how well it would stick.  I used Plaster of Paris which I found at Home Depot in the paint section (took me forever to find).  I found two different sites using this same recipe except one calls for 2 parts paint to one part plaster, while the other calls for 3 parts paint to 1 parts plaster.  I opted for the thicker mix.  I used 2/3 cup of paint to 1/3 cup of plaster and mixed really well.  I gave the sconces two coats and again allowed them to dry overnight.  I was put off a little at first with this mix due to some tiny bits that did not dissolve well.  But they sanded off easy enough. (I don't think I mixed this very well the first time.  I had no lumps the second time around with my craft table.) 

Overall, there were a few brush strokes showing after it dried and took a bit more sanding to remove them and smooth out.  I also had to work quickly, otherwise the section I was painting would start to dry and show more brush strokes.  The edges and detailing on the sconces distressed relatively easy, but on the flatter surfaces it took some elbow grease to get down to my base coat.  In other words this adheres great!  I feel this one will last the longest of the three recipes.  I followed up with two coats of natural min wax.


After all that, I decided I was going to stick with the Plaster of Paris chalk paint recipe.  So...... I did get my craft table painted and put together.  Here is a sneak peak at the top!


I will be posting this repurposed table soon, so check back to see what she looks like!  I personally LOVE it, and so glad it's finally finished too.


Saturday, April 28, 2012

Little Vase Makeover


The weather here has been rainy and cold, preventing me from getting my paint projects done.  So I decided to focus on getting things a little organized.  With all the new items I've recently brought home my back porch looks a little crowded and the dog is disgruntled because his spot (aka the whole room) is gone. 

Do you remember the little mustard vase I picked up while thrifting?  Well, I was itching to do something other than what I should have been doing (cleaning).  I gave her two coats of primer to cover that lovely shade of yellow, then a coat of a light khaki color.   After she was dry I applied the mystery glaze I'd picked up at the thrift store.  I forgot to take pictures of my progress,  I really was attempting to get something else done while I was playing!  Any who,  This being the first time I've really used glaze I wasn't so thrilled with the overall look.  It was just OK, so my next thought was to see if I could rush the drying process of the glaze.  I know I'm really impatient some times.  It dried quickly with a little heat. 

Now what to do???  Wax of course, I'd found a new and rather large stenciling brush I had bought a while back and thought it would work perfect for all the fine detailing.  So I started applying natural wax in a stippling motion all over the areas the glaze had settled.  It was coming along great, the wax had added that extra bit of depth I was looking for on the piece.  However, something else happened as well.  More of a goof on my part.  Probably from heating my glaze to dry it.  The top coat of khaki paint was brushing off in places to allow the white primer to show through.  Oops!  But I liked how it looked, a bit distressed and it softed the hard edges of the glaze....so I continued.

  I love it!! What do you think?


My hubby even said,"That's not to bad, Honey!  It was really ugly before."  I guess that means he likes it because he usually doesn't comment on the "cute stuff".


Monday, April 23, 2012

Auction Time!!!

There was an auction this past weekend.  But I didn't get to go!  I had already committed myself to an outing at the Franklin Park Conservatory with my mother, sister-in-law, and the kids.  I have to say I was very torn after going to the auction preview with my hubby the night before.  So I talked him and my father into keeping an eye on a few items for me since they both were going for equipment items.  I made a small I wish list, which I narrowed down to my three most wanted items.  There was a lot more I had eyes on, but I had to be realistic with my list as the men would be doing the "shopping" for me.  I have to admit though I verbally dropped a few hints as to other items that popped out at me.  Just in case.  You never know!  I waited all day for the auction to end and hear back on the goods.  Here is what they managed to snag for me, and only for $72 bucks!

Four original porch columns from a house build in 1887


Porch and Railing Parts


A lot of stuff huh!!  Now I have to find a place to put it. 

3 old chairs, there is another hiding in the corner that matches the smaller one.


2 large metal/brass (I'm not sure but they are very heavy) Chandeliers


And last but not least a freebie my mother took from her neighbors trash!!!  I was so proud of her.


Thursday, April 19, 2012

DIY Chalk Paint

As you know I've been wanting to try chalk paint.  I don't have a local dealer to purchase from and with the price of ASCP I cannot justify the purchase with the shipping costs.  Therefore I googled DIY chalk paint and here are a few options that I found that are simply added to latex paint:

Baking Soda Video Tutorial by Alchemy Fine Living

Unsanded Tile Grout Liz Marie Blog

Plaster of Paris and/or Calcium Carbonate Savvy City Farmer

All of these seem to work well for those that have tried them.  However, Some of these items are not easily located.  I decided to try the easiest one to find and what I already had, baking soda!  I'm hoping to try a few of the others as well and compare the finish.  There are a few other things I wanted to try with this paint as well that I've not yet found answers for.  I wanted to see how this paint crackled if at all when heat was applied.  ASCP claims their paint crackles by simply heating before dry, this excited me and I was hoping that one of these alternatives would have those same qualities.  I also wanted to see how this paint performed with wax distressing.

I snagged a few wood scraps from the garage office project for my paint victims.  I also used my thrifted paint!  So the samples are not exactly my favorite color choices but they worked.  

Not sure if you can tell very well, but the paint left very little brush strokes as it dried and has a somewhat gritty texture.


So I sanded with a 100 grit first which was relatively smooth and distressed easily, then I followed with a 220 grit and got a much smoother surface.  I've noticed regular latex tends to show a lot of the sanding lines from distressing, some unwanted.  This version of chalk paint has a very minimal amount which I like alot!  I then waxed the left side with dark minwax and the right with natural. 


On this board I clearly painted a dark base color.  To the right side of the board I applied a moderately thick coat of paint and heated with my hair dryer.  As you can tell it did not crackle.  I was so disappointed but not really surprised.  It did speed up the dry time to a few minutes and allowed me to distress it quickly, but some of the brush strokes where still visible drying with heat. 

To the far left side I applied clear paraffin wax to my base coat, painted a moderate top coat, and again heated with my hair dry.  Again no crackle, but it had a more chipped look when I sanded it.  I decided to sand the middle section so you could see the difference the wax makes.


And last but not least, I made a small batch of white because I wanted to see if the white I had would turn colors when I applied extreme heat!  Some whites will change pink or other colors when heated.  So this was the best time to test both the color and the chalk paint.  The left side of this board is the chalk paint while the right side is the regular latex.  Again I painted a base color and waited for it to dry.  Then I rubbed on clear paraffin wax.  Now time for the fun part!  I applied a thick coat of paint and immediately burnt it.  This melts the wax and causes the paint to bubble and burn anywhere you've put your wax.   The paint will dry quickly this way and you can immediately apply furniture wax, which will remove the ugly black, burnt bubbles and leave you with your base coat peaking through.

The chalk paint burned a tad bit more leaving larger bubbles than the latex.  It also has a bit of a textured and almost slightly cracked look that the latex does not.


Hopefully this is helpful to some and may answer a few questions.  I hope to try the other options soon and see how they perform under the same circumstances. 


Tuesday's Thrifting Adventure with Gavin

I've not been thrifting in quite a long time.  I ususally like to yard sale or hit the flea market mainly because it's easier for me to get a stroller around these places!  However, yard sale season has not started here in Ohio and the flea market has been a little bare and overpriced for my liking.  I love to thrift and thought I would give it a go, taking my two year old with me.  For someone watching me it must have been amusing because most thrift stores are so packed you cannot get a stroller in them.  So I chose to carry him in and hold him so he would not get into things.  Your laughing now I know you are!  Because even though I was holding him he was still grabbing at everything.  Anything I was looking at or even things behind me.  I had my work cut out for me.  Despite having an extra set of little fingers,  I managed to hit three local stores and grab a few fun finds and some strange one's too!  I also lucked out that two of the stores were having 50% off everything that day.  Whoo hoo!!!  So here is what the little man and I picked up:

Not sure why I bought this ugly little thing, but I thought it might be cute painted with a bunch of my pink peonies in it.  We will see!


This little table was my favorite find and yes I carried this out all by myself in one arm while holding Gavin in the other! I've not decided what I want to do with this piece yet.  It has one water spot on the top, but other than that it is in great shape.


And here are the rest of the smalls that I picked up;  Three wooden candle sticks, matching wooden frames, and a very strange wine rack that for some reason was just to interesting not to bring home. 


One thrift store even had a little hardware section where I was able to pick up some quart size miss matched paints, stains, and glazes.  At a half off $1.79 I think I bought most of what they had (minwax and valspar). I even found three sets of lacey curtains that may be used for a new sewing project. 

Now the question is what to do with it all and where to start.  Well today I started playing around with the paint and tried making my own chalk paint.  This way if I was not thrill with it I didn't waste a lot of money if I would have used my regular paint.  I'm still in the process of testing out different distressing techniques to see how it performs.  Then I'll be posting pictures later today hopefully of how everything turned out.

Wednesday, April 11, 2012

Shabby Sewing Drawers and Turntable

Well I was only able to work on two items this past weekend/week.  I had another project partially started which I finished, and I also got around to painting that large turntable I found in Florida for .50 cents.  Several weeks ago I had picked up a set of old sewing drawers that had been removed from the table and still had the frame work.  The frame was a little shaky and needed a brace on one side replaced to make the piece look a little more uniform.  I also added boards, on both the top and bottom, since all the frame work was open.  I plan on using these drawers for craft storage in the craft room, so thought I would try the two tone look to see if I like it.  I painted both the drawers and turntable two tone.  But after finishing the first piece, I decided that I was not so fond of the look and painted over the turntable so it was entirely white.  I distressed these by the same process as the previous pieces (bowl and small turntable) in an earlier post.  Here are a few pictures of the finished pieces. 


You can see where I painted the aqua underneath the distressed spots on the center of the turn table.  I think I like this much better than the obvious two-tone colors on the sewing drawers. 
So with my crafting table almost finished, I will be rethinking how I want to finish the table. 

My father has been helping me with the reconstruction of this table.  I've decided to modify it slightly to better fit the small room I plan to put it in.   In the process we discovered that the top of the table is not hard wood underneath the veneer, but a pressed wood.  So, I'm thinking of trying chalk paint instead.  I will keep you posted on this project as I hope to have it finished in the next week or so. 

Friday, April 6, 2012

My Recent Finds

Well let me just tell you, after spending a week on the Gulf Coast of Florida I came home to some very cool weather.  Brr!  However after hitting the yard sales with my mother-in-law at some of her favorite spots, I decided I was itching to start looking for some items to refinish or re purpose.  I also decided my next trip to Florida will require an empty trailer for me to fill and bring home.  There was just oodles of "junk" that I would have brought home if I had the space.  But, I had to settle for just a few items.  Lucky for me, My father was waiting with news of a farm auction the day after we returned home and the flea market across the street from my home starts booming around the beginning of April.  Ok, so time for pictures of the few items I picked up.

My flea market finds.....


I know this dresser needs a bit of work but I drove by three times to peek at it and see if it had sold yet.  Of course, I was running other errands and it was by no means out of my way to check on it! So today I brought it home. 


 Oops sorry hubby, yet another item that needs some love.  I saw this cute fan back chair tucked back in some older man's booth and new immediately I wanted it.  But, when he drug it out I almost cried when I saw the method at which he decided to fix the split seat.  It did, however, give me the leverage to bargain him down more than half what he was asking for it.  So it came home as well.

My auction items.....


Not my usual choice, but picked this up merely due to price. I like the curvy details and lion head knockers on the sides.  I also picked up four boxes of new hard wood flooring.  My husband just looked at me and asked, "What on earth are you going to do with that!".  I just shrugged and told him I would figure out something to use it on.  He later told me that it might look good in his office down at the garage.  I think he's wanting to steal it away from me.

And last but not least, I drug home a rather large turn table and wooden picture frame from Florida.  For two dollars total, I just couldn't help myself.


I was quite amused when my husband asked if that picture was actually going to be hung up in the house.  He should know me better than that, he he he.

I'm not completely sure what do with each item yet, but I do have a plan for a few.  Any thoughts???  I'm undecided on how to finish the end table, paint or re stain? And, not sure if I like the distressing done on the teal chair.    I hope to start on these after Easter and have some pictures posted of the end product.