Showing posts with label aged. Show all posts

Saturday, April 28, 2012

Little Vase Makeover


The weather here has been rainy and cold, preventing me from getting my paint projects done.  So I decided to focus on getting things a little organized.  With all the new items I've recently brought home my back porch looks a little crowded and the dog is disgruntled because his spot (aka the whole room) is gone. 

Do you remember the little mustard vase I picked up while thrifting?  Well, I was itching to do something other than what I should have been doing (cleaning).  I gave her two coats of primer to cover that lovely shade of yellow, then a coat of a light khaki color.   After she was dry I applied the mystery glaze I'd picked up at the thrift store.  I forgot to take pictures of my progress,  I really was attempting to get something else done while I was playing!  Any who,  This being the first time I've really used glaze I wasn't so thrilled with the overall look.  It was just OK, so my next thought was to see if I could rush the drying process of the glaze.  I know I'm really impatient some times.  It dried quickly with a little heat. 

Now what to do???  Wax of course, I'd found a new and rather large stenciling brush I had bought a while back and thought it would work perfect for all the fine detailing.  So I started applying natural wax in a stippling motion all over the areas the glaze had settled.  It was coming along great, the wax had added that extra bit of depth I was looking for on the piece.  However, something else happened as well.  More of a goof on my part.  Probably from heating my glaze to dry it.  The top coat of khaki paint was brushing off in places to allow the white primer to show through.  Oops!  But I liked how it looked, a bit distressed and it softed the hard edges of the glaze....so I continued.

  I love it!! What do you think?


My hubby even said,"That's not to bad, Honey!  It was really ugly before."  I guess that means he likes it because he usually doesn't comment on the "cute stuff".


Wednesday, April 11, 2012

Shabby Sewing Drawers and Turntable

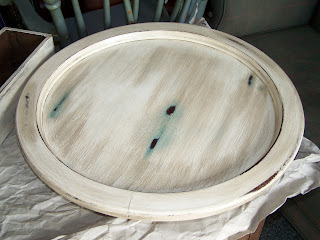
Well I was only able to work on two items this past weekend/week.  I had another project partially started which I finished, and I also got around to painting that large turntable I found in Florida for .50 cents.  Several weeks ago I had picked up a set of old sewing drawers that had been removed from the table and still had the frame work.  The frame was a little shaky and needed a brace on one side replaced to make the piece look a little more uniform.  I also added boards, on both the top and bottom, since all the frame work was open.  I plan on using these drawers for craft storage in the craft room, so thought I would try the two tone look to see if I like it.  I painted both the drawers and turntable two tone.  But after finishing the first piece, I decided that I was not so fond of the look and painted over the turntable so it was entirely white.  I distressed these by the same process as the previous pieces (bowl and small turntable) in an earlier post.  Here are a few pictures of the finished pieces. 


You can see where I painted the aqua underneath the distressed spots on the center of the turn table.  I think I like this much better than the obvious two-tone colors on the sewing drawers. 
So with my crafting table almost finished, I will be rethinking how I want to finish the table. 

My father has been helping me with the reconstruction of this table.  I've decided to modify it slightly to better fit the small room I plan to put it in.   In the process we discovered that the top of the table is not hard wood underneath the veneer, but a pressed wood.  So, I'm thinking of trying chalk paint instead.  I will keep you posted on this project as I hope to have it finished in the next week or so. 

Tuesday, March 13, 2012

Distressing with paint and stain

I've been a little distracted lately with two projects, an office for my hubby's auto garage and a craft/toy room for Gavin and I.  The majority of my time was spent priming the office, and now that I'm not tired from that I'm ready to jump back into the craft room.  I'm currently in the process of up cycling and old bed and table top into my craft table.   However, today I decided that after buying paint for the table and accessories I have no idea how I really wanted the finishes to look.  Sooo, what better way than to make some samples. :o)  I had a few spare metal items, wooden bowls and a lazy susan that I thought might work in the craft room and would be perfect to experiment on.  And here is what I came up with.


So what do you think?  I really like how the robins egg blue turned out, looks a little shabby chic I think.  I'm still debating on which to use for my craft table.  I may just use both! 

I was really bad about taking pictures throughout the process but here is what I did to each.

Both the bowl and the lazy susan were unfinished wood.  Since I was just experimenting I didn't take the time to sand these before painting but I would suggest lightly sanding before you paint.  Make sure to use a fine grit and sand along the grain of the wood. 


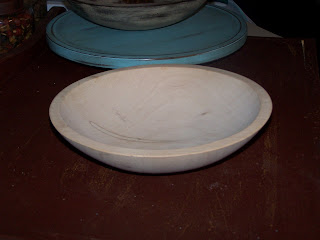
Lets start with the bowl.  First I slapped on a thin coat of a milk chocolate color.  Once dried, I dry brushed the bowl with a creamy white color.  Dry brushing gave me a more textured look and allowed me to leave some of the base color to show through.    Once the paint was dry I sanded and sanded.  I think I used 120 grit, which will take it off a little quicker.  I sanded places that I thought one would find normal wear on an old bowl.


Once I was happy with the appearance of the bowl, I wiped it down with a dry cloth to remove any excess dust.

Now time for the messy part.  I liberally applied a dark wood stain to the bowl and let it sit a few minutes.  Then using a clean cloth (I used and old white t-shirt) wipe of the stain.  If you want your paint to remain as close the the original color I would suggest wiping off immediately.  Or, apply the stain with a q-tip or cotton ball only to the areas you want stained, leave for a few minutes and wipe clean with a dry cloth.  Alternately, if you prefer a more aged look leave your stain on a few minutes longer before wiping off.


Then let your bowl air dry until no longer tacky.  I decided to finish my bowl with a wax finish for protection and it adds a slight sheen and makes the stained wood look aged.  My favorite is Paste Finishing Wax by Minwax.  I confiscated a long sock from the hubby's sock drawer (I made sure it had a hole to justify ruining it) and buffed the wax all over the bowl. 

I used the same technique for the lazy susan, except I did not paint it brown first.  I used one thick coat of Rust-oleum's Ultra Cover 2x in satin aqua.