Thursday, May 17, 2012

Digital Scrapbooking

I decided to take a small break from painting, mainly because it had been raining.  But, I was working on a project for Mother's day and thought it would make a great post.  Since my mother pops in and looks at my blog, I decided to post this after Mother's day.  That way I wouldn't ruin the surprise. 

Any who,  I used to love scrap booking.  But after becoming a mother my time became limited and so did space.  I would start a page and be able to leave it and come back to continue.  Not so much anymore, little fingers are always itching to get into stuff.  I had occasionally seen sites for digi scrappers.  I thought I would give this a try, but I didn't want to spend the money on a program and not like it or decide that I preferred the old way.  So I started looking for free trial programs.  I downloaded a few and ended up only keeping 2 on my computer which I use regularly and for more than just scraping.  My first and favorite is call Studio Scrap .  This program is extremely user friendly! At the time I had downloaded version 2 it was the full program, however you could upgrade to version 3.   I tried it and love it!!!  You can still download a trial from their website, however it is the current version 4 and puts a watermark across your project.  My version (Studio Scrap 2) does not have the watermark.  I think they realized they made an error, but to every one's advantage!  You can still obtain this version by simply searching and downloading from you favorite sharing site, there are several. 

My next favorite program is Gimp.  If you have ever used Adobe Photoshop, this is it's twin in almost every way.  You can do sooo much with this program.  My only qualm about this program is that there are some glitches with compatibility to Windows 7 operating system.  Mostly it just closes out on you, but this has only happened to me a few times and I'm not a computer guru, so I'm not sure which settings to change to fix it!  So I would suggest regular updates as they are constantly improving this program for users.  The other draw back, if you've not used an image manipulation program before, this may not be the best program for you due to lack of a tutorial within the program.  There are however several you-tube video tutorials to help explain and teach you to get the desired results your looking for.  I might add that I had only used Photoshop a handful of times many many years ago!  So I'm big on the video tutorials.  Much like photoshop, Gimp comes preloaded with your standard brushes and textures.  You can also upload your own.  Gimp will accept any add-on software that you can put into photoshop as well!!  I love using different brushes to create my own photo masks,  which I download for free at www.deviantart.com/.  Just search for Photoshop or Gimp brushes and you'll be surprised at the variety of tools you can download for this program.

Now for the fun part.  To start out I had search for free download items like papers, elements and what not to play around with.  I've not purchased loads of kits, most of my collection was free downloads provided to entice individuals to purchase their products.  On that note, I have found a favorite site for purchasing Digi Scrap items, After Five Designs.  They are the only site I've purchased from so far.  Merely due to the design quality.  I've not found another site that offers, what they have.  In my opinion, these ladies are extremely talented with original ideas, and they are constantly designing new kits. 

If you are interested in digital scrapping I suggested peaking at their website or finding them on Facebook.  They almost always have a promotion going on and frequently have guest designers as well.   You may think you don't have the time or patience to try it, but never fear they've taken the guess work out for you!  Almost all their kits come in quick pages as well,  I like these for when I'm in a rush to get something done or my creative juices just aren't flowing!

Ah!  So, you probably what to see some pictures.  Here are the two photos I made for my mother and mother-in-law for Mother's Day.


And for this one I Sea You by NLD

For both of these I used Gimp to make my own word art and to apply the photo mask to the first photo.  The rest was designed with the Studio Scrap 2 program.


And here is a little peak at our Christmas cards that I made for 2011 from the kit


My kid is so cheesy!  I used one of the Christmas card layouts and just inserted his photo.  Then I added the hat and both word art elements.  And viola!  Cute Christmas card! 

Have fun Scrapping!


Thursday, May 10, 2012

Repurposed Craft Table

After the hubby and I found out we had a little bundle of joy on the way, I had to give up my craft room to a nursery.  Most of my stuff went to storage totes and miscellaneous places around the house.  I decided it had been long enough and I wanted a space to do my crafts again.  The only available space for a craft table was in the toy room!  I thought I can make this work, ha ha ha.  (The toy room is only an 8x10 space)  In my mind I had a picture of a long tall table with storage on shelving and in the closet.  This would keep little fingers away for a little while.

I already had two table tops that were purchased for $9 bucks each several years ago....several!  One was too small and the other was too big.  But the larger table would pull apart to allow an additional leaf.  So my thought was to disassemble the table and rotate the two pieces to make a narrow long table that would actually fit my space restrictions.  Sounds easy right.  Not so much.  After discussing with my father, he informed me that additional support would have to be added due to the extended length.

Next I had to find legs, but the only thing I had laying around was an old four post water bed that we no longer needed and had some water damage due to a leak.  Hmmm, the posts ended up being the perfect size to fit in the already made leg pockets of the table.  All I had to do was cut them.

Most of the assembly work and modifications were done in my fathers workshop because I don't have a space large enough to work on this size of a table.  But, from the pictures you can see where we added the additional supports.

We used as much of the original skirt as we could, but had to add two additional pieces to the front and back.  Every thing was unscrewed from the table and then refit as best as we could.  Then once we laid out our pieces, we marked on the table top where each corner fit.  This way we could assemble the skirt, add glue and then place it back into position. Those two rather large black braces are actually the old tracks that would allow the table to pull apart for the leaf.  We bolted them back on, but to keep them from moving had to run a bolt through both pieces of the track to keep it from sliding.  My father still wasn't happy with the support and wanted to make sure that the table could be stood on, LOL.  Just in case my monkey boy actually gets onto this table.  So he added a 2x4 down the center to the table length wise.


Here we cut two angle supports, similar to the originals, for the additional skirt pieces we had to insert.


Angled pocket holes were also drilled from old skirting to new skirting.


And last but not least, even though the posts were large enough to fit into the corner pockets they sat flush with the table skirt.  I wanted the legs to sit out about a quarter inch.  So to push them out a bit we added a trimmed piece of wood to fit inside the pocket.  This way the leg will still sit flush against the inside support and wont have a gap when the bolts are inserted.


Time for table legs!  Instead of using the bed post from the bottom up (if that makes sense), I cut my legs from the middle of the post.  Not only did this leave me with enough to get two smaller sets of legs for other projects, but I wont have a rather large section of square post on the top portion of the table leg before it tapers off.  Looked a little goofy to me! 

You can see the full length of the bed post and where I used the middle section.


You can't really tell from the picture, but the left is the tapered end (bottom) of the table leg.


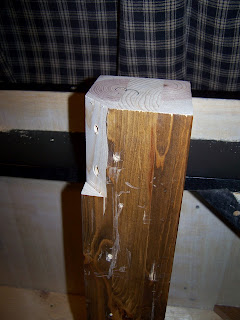
Next the corner had to be cut so it would sit flush in the leg pocket.  Then two pilot holes were drilled for lag screws.  Lag bolts can also be used to prevent stripping out the wood if you need to disassemble your table to move it.  I decided to use screws because this table is so heavy without the legs that I never want to move it again!


Finally, I get to paint!  While modifying the table we realized that in fact the top was not made of wood!  Ack!  It's some kind of really heavy composite something or other, ha!  With that I decided to try chalk paint so I would not have to sand down the top.  First I gave most of the underside and legs a coat of black spray paint.  Then I ran paraffin wax around all the edges and anywhere else I wanted to see the black come through.  I opted for this for two reasons; first, I was unsure how the "wood" table would react with stain and secondly, after painting another piece with the plaster of paris chalk paint I did not want to be sanding all day! 


Next came my top coat of chalk paint, which I sanded and distressed.  But the colors were a little too bright for me so I brushed on minwax stain in dark walnut and let it sit a few minutes before wiping it off.  Once the stain had dried I applied two coats of minwax finishing paste. 

Here is a little close up of how the chalk paint comes off with the wax underneath.  It's almost a little chippy, but be careful not to rub on too much wax in one spot.  A little goes a long way!

And here she is all said and done!  I believe the table sits 39 in. from the floor to table top and is 33"x77".  That just barely fits my 8x10 room. 


Now I just need to get some stools!


Wednesday, May 9, 2012

DIY Chalk Paint Follow Up

Boy have I been a busy little bee over the weekend.  Last week I decided to pick up unsanded tile grout and Plaster of Paris for my DIY chalk paint.  If you remember a few posts back I'd only tried the baking soda recipe, but still really wanted to find one that would crackle.  I knew my crafting table would be coming home from my dads workshop and would be ready to paint, so I wanted to try these others out before deciding which recipe for chalk paint I like best.

On this first piece I had already sanded it a while ago, but it was waiting for me to decide what I wanted to do with it.  I thought it would make a great candidate!  I used unsanded tile grout mixed with my latex paint (recipe: 1 cup paint to 1 tbsp grout).  My first impression was that it covered well and seemed to go on and dry relatively smooth.  I painted two coats and allowed to sit overnight, then I sanded it the next afternoon.  I started out using 100 grit, but quickly changed to a finer grit (220).  This stuff comes off way to easily for my taste.  I have to wonder how well it's going to adhere to the surface over time (and I sanded this one too!) However of the three, this chalk paint recipe had the smoothest finish with little to no brush strokes.  So If your wanting a super smooth finish, this one's for you.  I would strongly recommend sanding well before painting though.  And follow up with a wipe on poly finish or two good coats of wax.  I did test a few patches of paint on scrap wood I had, I was unable to get this recipe to crackle, bummer.


For the last chalk paint recipe, I decided some ugly gold wall sconces would be my next volunteers.  I didn't want to see the gold too much underneath so I gave them a quick spray in black.  All I had on hand was a high gloss black and thought this would be perfect to see how well it would stick.  I used Plaster of Paris which I found at Home Depot in the paint section (took me forever to find).  I found two different sites using this same recipe except one calls for 2 parts paint to one part plaster, while the other calls for 3 parts paint to 1 parts plaster.  I opted for the thicker mix.  I used 2/3 cup of paint to 1/3 cup of plaster and mixed really well.  I gave the sconces two coats and again allowed them to dry overnight.  I was put off a little at first with this mix due to some tiny bits that did not dissolve well.  But they sanded off easy enough. (I don't think I mixed this very well the first time.  I had no lumps the second time around with my craft table.) 

Overall, there were a few brush strokes showing after it dried and took a bit more sanding to remove them and smooth out.  I also had to work quickly, otherwise the section I was painting would start to dry and show more brush strokes.  The edges and detailing on the sconces distressed relatively easy, but on the flatter surfaces it took some elbow grease to get down to my base coat.  In other words this adheres great!  I feel this one will last the longest of the three recipes.  I followed up with two coats of natural min wax.


After all that, I decided I was going to stick with the Plaster of Paris chalk paint recipe.  So...... I did get my craft table painted and put together.  Here is a sneak peak at the top!


I will be posting this repurposed table soon, so check back to see what she looks like!  I personally LOVE it, and so glad it's finally finished too.